

When you’re on a mission to bring order to chaos, you need the right gear for the job. Sometimes that means working loud, unarmed, but often it requires finesse and equipment tailored to the mission. Here are the best downloads for Ready or notflexible for any occasion!
The best loads, ammunition and equipment in Ready or Not
The best builds in Ready or Not won’t be universally used between missions, but many of them work as multipurpose builds with little customization. Some differences are subtle, like armor plate types, while others, like the Lockpick Gun, have hyper-specific cases where they’re vital.
On the subject: How to get an S rank in Ready or Not
I will argue that regardless of the build you choose, your primary weapon should ideally be an AVC Assault Rifle or a Beanbag Shotgun if you want to get the best results. Lethality makes all the difference in accomplishing a mission or even in many ways just being successful.
Blitz-breakthrough
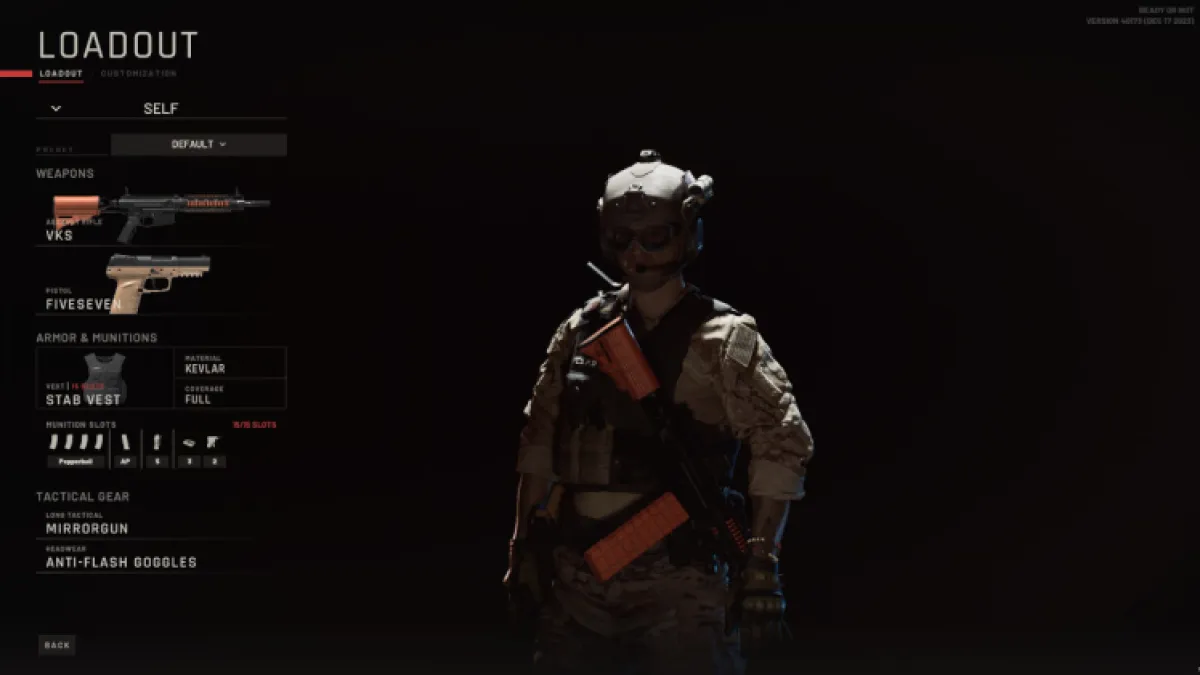
This build is the fastest of the downloads I’ll be showing for Ready or Not. It’s perfect for early missions like Twisted Nerve, where you need to quickly clear rooms, throw down stun grenades, and constantly stay on your toes against enemies who are actively looking for you.
- Armor: Knife vest
- material: Kevlar
- Coverage: Full
- ammunition: 1x AP Pistol Mag
- Equipment: 5x Flashbang, 3x Wedge, 2x Lockluck Gun
- Long Tactical: Mirror gun
- Headgear: Anti-flash glasses
The Vest with Kevlar allows you to move quickly in any case, without false starts. This is great if you’re trying to calm down or intimidate opponents but aren’t prepared for a firefight.
Handgun ammo is for emergencies only because I’m all for keeping it as non-lethal as possible unless you fear for the hostage’s life. With yours Anti-flash glassesa ton of Flashbang grenades are a great natural choice, and they work on a variety of room-focused maps like 23mbps, Twisted Nerve, Rust Belt, and more.
Other assurances like Mirror gun and A gun for hacking help you figure it out and quickly storm the room without alerting the enemies. Finally, Tankette vital when you’re rallying your team to a key location and fearing a surprise attack from another door in the room.
It’s loud

I couldn’t think of a better name for it, but this loadout prioritizes defense without sacrificing speed.
- Armor: Light armor
- material: Ceramic
- Coverage: Full
- ammunition: 1x AP Pistol Mag
- Equipment: 3x Flashbang, 2x Stinger, 3x C2
- Long Tactical: Shotgun broke through
- Headgear: Ballistic mask
This one moves a little slower, but with Ceramic plates, you can fend off more counterfire in short skirmishes. You can change your ammo depending on if you want a lethal version of this build, but the 1 AP Pistol Mag is the default I use, the HP ammo is often too damaging for a good run.
Flashbangs the feature here is also significant, although you can trade some for the Stinger if you want. however, C2 appears great tool for enemies that hug the door when you hear their breathing on the threshold, allowing you to stun them and even get an achievement if you get caught in that blast!
The Shotgun broke through handy for breaking down any door, but make sure you order your team to clear the room with you once you break down the door. Finally, Ballistic mask as a last resort protects against small arms.
Darkness

A similar build begets a similar name in this slightly modified version of the previous build. It trades protection for visibility and will prove its worth for easier exploration of dimly lit rooms, tunnels and night maps.
- Armor: Light armor
- material: Ceramic
- Coverage: Full
- ammunition: 1x AP Pistol Mag
- Equipment: 5x Flashbang, 3x C2
- Long Tactical: Taran
- Headgear: NVG
I was able to do some pretty heavy pushing in missions with this and the Beanbag Shotgun, VKS, or MCX when it was lethal. The NVG make a difference in high intensity missions even in Twisted Nerve where you start to see the tunnels factor, or even just open parts in the dark.
Battering Ram, if you can coordinate your team, allows instant dynamically entering, knocking and opening almost any door you come across. Being able to see these threats and catch them off guard in the dark and force them into submission is a huge advantage.
Crowd control

This is one of Ready or Not’s best loadouts, the closest to an EQ you can get for really tight maps like Greased Palms. This allows you to avoid oncoming fire while dealing lighter shrapnel damage to the covered body area. It’s slow though, so keep that in mind with the following details:
- Armor: Heavy armor
- material: steel
- Coverage: Full
- ammunition: 1x AP Pistol Mag
- Equipment: 2x Flashbang, 2x CS Gas
- Long Tactical: Tactical shield
- Headgear: Gas mask
Heavy armor better if you double it, so steel it’s the right way to go as long as you don’t cause too much fire. Here is where Tactical shield factors, providing protection when you are in an active shooter scenario.
Like all other builds, the 1 AP Pistol Mag is for the worst case scenario where your primary weapon is too slow to reload. Flashbangs and CS Gas are key here in containment situations: Flashbangs are ideal for small rooms and corridors, and CS Gas is best for dispersing crowded enemy mobs.
Finally, the gas mask allows you to walk through the cloud of smoke you create with gas grenades, pushing enemies against walls and behind cover so you can arrest them individually.
Close maintenance

This latest build is another tweak to the Light Armor builds, with a greater focus on quick scoring and storming rooms with your team. I like using this build with the Beanbag Shotgun as it has faster non-lethal potential than the Pepperballs, but with the downside of being potentially lethal if you overdo it.
- Armor: Light armor
- material: Kevlar
- Coverage: Full
- ammunition: 1x AP Pistol Mag
- Equipment: 2x Flashbang, 2x Stinger, 1x Wedge, 2x Taser
- Long Tactical: Mirror gun
- Headgear: Ballistic mask
This build is flexible, but aimed at deterring threats, blinding trigger-happy enemies with nearby civilians, and subduing targets when there are no innocents nearby. That’s great, but in this case you’ll want a little kevlar speed. Stock up on a lot of basic ammo and consider trading for another Flashbang when you need it!
My favorite weapon in Ready or Not
You may have noticed that in most cases I haven’t looked specifically at guns. This is partly because you can tailor this part to how each weapon works for you, but I’ll give a quick rundown of the best weapons I’ve come across in the game:
- Non-lethal: Prosecutor’s office
- Assault rifle: G36C
- Submachine gun: P90
- Shooting: Supernova
I’d like to nominate the Beanbag Shotgun as an honorable mention, but as far as non-lethal options go, Prosecutor’s office there is perfect. Pepperballs provide something of a ricochet effect for bullets, where you can shoot through the walls and floors of nearby enemies and stun them. It was a life saver and you can look in the door to take pictures like this after spotting them with the mirror.
The G36C large enough with high accuracy at close to long range, room for accessories and high maneuverability. Meanwhile, P90s has been a mainstay in the real world of counter-terrorism and policing, with fantastic ammo capacity and handling, albeit with an unconventional mag cartridge. Finally, if you’re going to be loud, then Supernova can be fired without any finesse and take out any threat from a surprisingly long distance, it’s pretty broken for lethality oriented players.
Generally, the best loadouts you can choose from in Ready or Not offer little variation, but with the right tools for the job, you’re more likely to survive with your team. Instead of a one-size-fits-all build, you should have a few ideas like this on standby for when you get stuck in the game!